 available on
  also available on


Command Creation
What is a Command
A command ties a movement to an action like starting an app. For example you might use a move of the handheld to the left and back (a return move) to start a torch app.
Commands are grouped together into tags. A tag contains a set of one or more commands that are related in some way. For instance, one of the tags that comes with FlickStart is called 'Music Player'. It has a set of five commands for making the music player on the handheld do different things. Each command is triggered by a different movement.
You don't want all commands to be triggered when you make a particular movement. Sometimes you will want the torch app to be triggered, other times you want the music player triggered. FlickStart let's you decide which command sets are active at any time.
Commands with the Smallest Setup Requirements
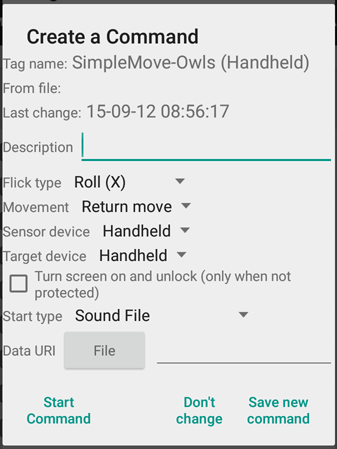
Commands for just starting an app (either on the handheld or the wearable) are very easy to create as FlickStart can work out most of the details when you select the app from a list of apps. Commands based on built-in functions are also easy to set up as the built-in functions know about the complex bits of the command and just need a few items from you that are simple to provide. All the command creation operations have a section in common as in the image below:
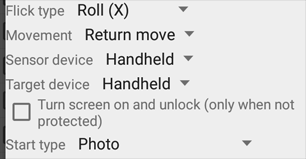
All commands need to have an indication of whether the movement should be a simple move in one direction or a return move. The default is for the return move since that sort of move has less chance of being triggered by accident.
You also need to specify which direction the movement should take ('left', 'roll around the X axis', etc).
Next, you need to choose the sensor device (handheld or wearable) so that FlickStart will wait for the movement on the right device.
You might need to indicate the target device (where the action should take place, on the handheld or on the wearable).
If the command starts an app you can decide whether you want the target screen to turn at the same time so you can see the app straight away.
Finally, you may need to set the type of action ('Start type'). There are a few built-in actions (eg. take a photo) and many specialised Android actions. Of the Android actions, you will probably just use the 'Start Activity' (for starting an app), the rest are best left for developers to tinker with.
Depending on the command there may be other bits of information you might want to specify, although defaults will probably do in most cases. The builti-in command types are listed below.
When you are creating a command, the 'Start Command' button can be used to test the command at any time (the command is triggered as if the movement had occurred).
Start an app on the Handheld
These commands are created by moving to the 'HANDHELD' tab and tapping on an app in the list (you can also edit existing commands created this way).
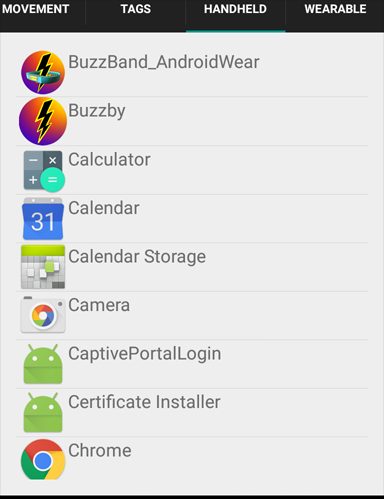
A panel appears after you tap an item in the list and you can put in a tag name and command description and choose the movement associated with the new command:
If you want the command to be active immediately check the box at the top of the panel.
If you want the screen to come on and unlock when the app starts, tick the other check box on the panel. The unlock feature only operates when you don't have a password PIN or pattern set and the Android version is 5.0 or higher.
If the app you have chosen has a number of panels it can display, you may see an extra choice at the bottom of the command creation panel:
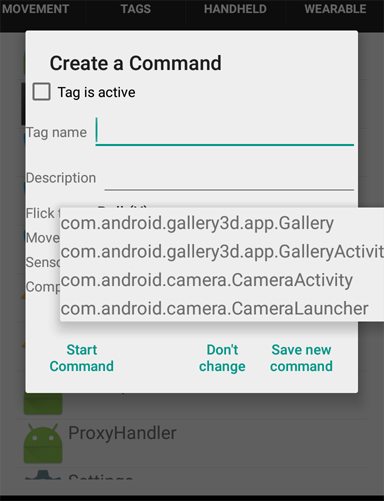
Unless you have detailed knowledge of the way the app works you should leave the item as it is first shown.
Start an app on the Wearable
These commands are created by moving to the 'WEARABLE' tab and tapping on an app in the list (you can also edit existing commands created this way).
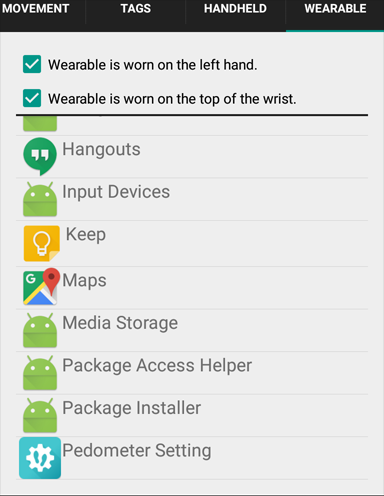
A panel appears after you tap an item in the list where you can put in a tag name and command description and choose the movement associated with the new command:
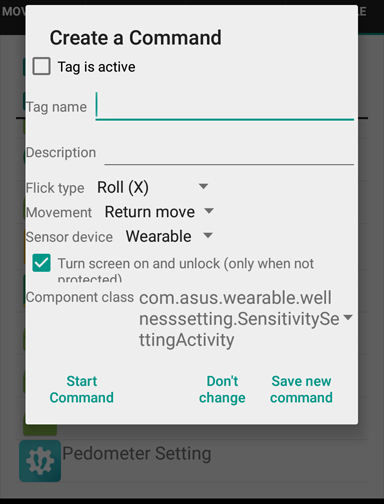
If you want the command to be active immediately check the box at the top of the panel.
If you want the screen to come on when the app starts, tick the other check box on the panel.
If the app you have chosen has a number of panels it can display, you may see an extra choice at the bottom of the command creation panel:
Unless you have detailed knowledge of the way the app works you should leave the item as it is first shown.
Send a 'Key' to Other Apps
Some apps like music player apps listen for 'keys'. Keys were (at least initially) physical keys on a keyboard. On a handheld, some of the switches and rockers work like the old keys and so do various bits of headphones that you can attach to your handheld. FlickStart can simulate these physical keys and so control some apps. The set of commands that come with FlickStart for controlling the music player is based on sending a specific 'key' for each movement.
There is a standard list of keys for Android here. In that list you will see entries like KEYCODE_MEDIA_PAUSE. This key has a value of 127. When that number is broadcast properly, a listening music player will toggle it's pause state.
If you know an app is listening for a key and you know the number, this command will let you send the key to the app.
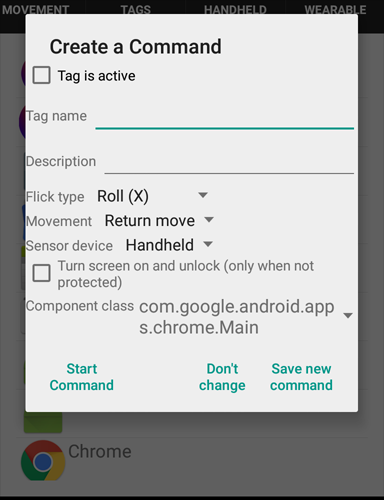
To create a command to send a key you need to get to the 'Create a command' button in the 'Tag Details' panel. You can reach the panel from the 'TAGS' tab by creating a tag, or editing an existing tag by tapping on it, or tapping on an app in the 'HANDHELD' or 'WEARABLE' tabs. A tag is just a way of naming a group of related commands.
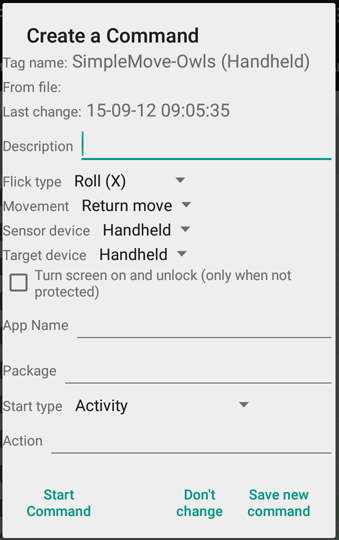
When you tap the 'Create a command button' you get the following panel:
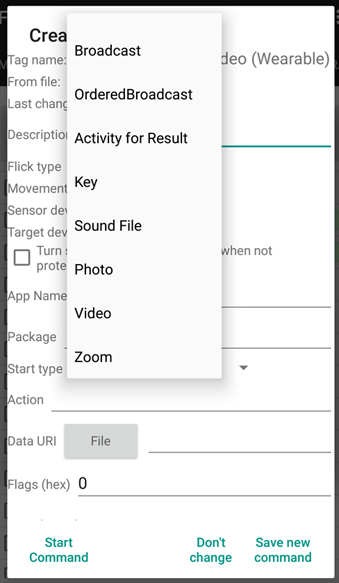
To make the command a 'Key' command, tap the 'Start type' spinner (it will be showing 'Activity') and scroll down and select 'Key'.
Once you select 'Key' the panel simplifies itself as the key command only needs the key number.

Play a Sound File
Each of the tags in the 'TAGS' tabs that start with 'Sound-...' provides an example of this kind of command.
The 'play a sound file' function was added to FlickStart because trying to start a particular sound file using most other Android apps is just too hard.
Please note that a command using this function starts the sound file playing, but there is no way to stop the playing, so keep your sound files short (eg. 2-3 seconds)!
To create a command to play a sound file you need to get to the 'Create a command' button in the 'Tag Details' panel. You can reach the panel from the 'TAGS' tab by creating a tag, or editing an existing tag by tapping on it, or tapping on an app in the 'HANDHELD' or 'WEARABLE' tabs. A tag is just a way of naming a group of related commands.
When you tap the 'Create a command button' you get the following panel:
To make the command a 'Sound File' command, tap the 'Start type' spinner (it will be showing 'Activity') and scroll down and select 'Sound File'.
Once you select 'Sound File' the panel simplifies itself as a sound file command only the needs the file location.
When you tap the 'File' button a panel appears allowing you to browse around the file system till you select the sound file you want attached to the command.
If you want the command to be active immediately check the box at the top of the panel before you save the command.
Take a picture on the Handheld
The 'FlickStart Commands (Wearable)' tag in the 'TAGS' tab contains an example of this command ready for use. If you make the tag active and enable the sensor on the wearable (using the button on the 'MOVEMENT' tab), a roll of the wrist (and back again) will trigger a photo using the back camera.
This function only works on Android 5.0 or higher, although you can create the command on 4.4 or higher. Please note that some phone manufacturers have not implemented the camera API introduced in 5.0, in which case attempts to use photo commands will fail with an error message.
A command using this function makes the camera on your phone (front or rear) take a single picture. Since the command is meant to be activated at a distance by a movement of your wearable, the screen is left dark while the shot is taken. In fact, the screen can be off.
By way of feedback that the picture has been taken, a tiny version of the photo will pop up on your wearable screen. It may take about 5-6 seconds for the small image to be transmitted from the phone to your watch. The image stays there for 20 seconds (although tapping the screen restarts the 20 second period). If you have taken a series of pictures, the last 25 are available by scrolling down. To view the photo list again at a lter time, bring the FlickStart app onto your watch screen swipe left from the first card to the 'Show photo' card and tapping once.
FlickStart tries to maximise the size of the image displayed on the watch so part of the image will initially be below the bottom of the watch screen. Careful dragging of your finger from the bottom of the screen to the top will scroll the image upwards.
To create a command to take a picture you need to get to the 'Create a command' button in the 'Tag Details' panel. You can reach the panel from the 'TAGS' tab by creating a tag, or editing an existing tag by tapping on it, or tapping on an app in the 'HANDHELD' or 'WEARABLE' tabs. A tag is just a way of naming a group of related commands.
When you tap the 'Create a command button' you get the following panel:
To make the command a 'Photo' command, tap the 'Start type' spinner (it will be showing 'Activity') and scroll down and select 'Photo'.
Once you select 'Photo' the panel simplifies itself as the photo command has only a couple of things you can change.
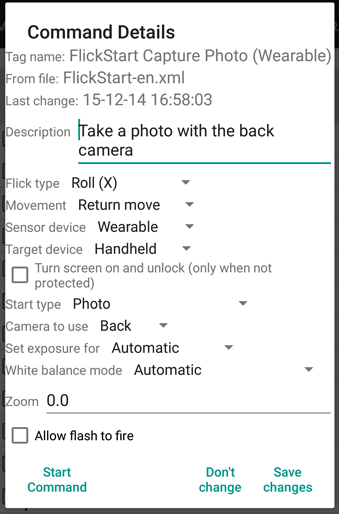
If you want the command to be active immediately check the box at the top of the panel before you save the command.
After a photo is taken, the full sized image is placed in the 'FlickStart/Photo' folder with a filename which is the date and time of image capture. The image is also added to your phone's photo gallery and can be viewed from your gallery app.
The watch holds the last 25 photos taken with the photo command. You can look at the list of photos anytime by bringing up the FlickStart app on the watch and swiping left where you will get a summary of the photo list. Tapping on the summary takes you to the most recent photo, from where you can scroll down to see the other photos.
On some phones (eg. the Nexus 5X) it's possible to take a shot with the front and back camera at the same time. To achieve that with FlickStart, take two commands (one for the front camera and one for the back) and make them both triggered by the same movement. You can trigger a tag from a watch with movement, or from the phone or watch by doing a long press on the tag. Not all phones allow simultaneous camera usage, so you may get a "Camera busy" message on the screen when you try this.
Take a video on the Handheld
The 'FlickStart Commands (Wearable)' tag in the 'TAGS' tab contains an example of this command ready for use. If you make the tag active and enable the sensor on the wearable (using the button on the 'MOVEMENT' tab), a move back (and return to the same spot) will start a video capture using the back camera. The capture can be terminated by repeating the motion (or by using the notification from the video start).
This function only works on Android 5.0 or higher, although you can create the command on 4.4 or higher. However, some phone manufacturers have not implemented the camera API introduced in 5.0 so you should trigger the FlickStart video capture command on your phone to check.
A command using this function acts like a light switch, turning the video capture on with first use and turning capture off with second use. The video capture is meant to be done at a distance, being triggered by a movement of your wearable. As a result, the screen is left off during the capture period. The phone's LED is blinked while the capture is in progress, but as you won't see the LED if you are the subject of the video. FlickStart sends a notification to the wearable indicating whether the capture has started or stopped. In addition, the notification for the start of a video capture has a provision for stopping the capture. So you can turn off a video capture in either of two ways, by a movement triggering the command again, or use the option in the notification.
To create a command to take a video you need to get to the 'Create a command' button in the 'Tag Details' panel. You can reach the panel from the 'TAGS' tab by creating a tag, or editing an existing tag by tapping on it, or tapping on an app in the 'HANDHELD' or 'WEARABLE' tabs. A tag is just a way of naming a group of related commands.
When you tap the 'Create a command button' you get the following panel:
To make the command a video command, tap the 'Start type' spinner (it will be showing 'Activity') and scroll down and select 'Video'.
Once you select 'Video' the panel simplifies itself as the video command has only a couple of things you can change.
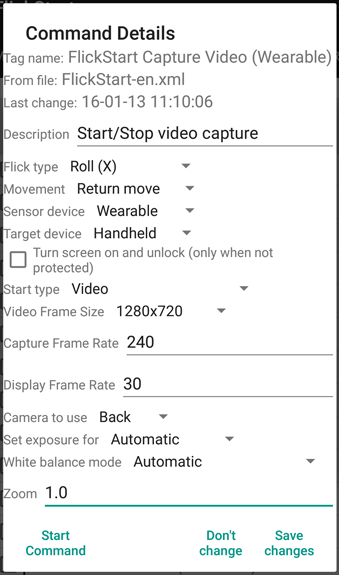
Not all phones have the same capabilities for video frame size and rate. If you choose values that are not supported a small message pops onto the screen indicating an error when the command runs. Use the 'Start Command' button to test your choices.
After a video capture is complete, the file is placed in the 'FlickStart/Video' folder with a filename which is the date and time of start of the capture. The video is also added to your phone's photo gallery and can be viewed from your gallery app.
If you want the command to be active immediately, check the box at the top of the panel before you save the command.
On some phones (eg. the Nexus 5X) it's possible to do video captures with the front and back camera at the same time. To achieve that with FlickStart, take two commands (one for the front camera and one for the back) and make them both triggered by the same movement. If simultaneous still photos are possible on the handheld it's likely that FlickStart can be used to start/stop simultaneous front and back camera video captures also. You can trigger a tag with two commands from a watch with a movement, or from the phone or watch by doing a long press on the tag. For video capture, the first trigger of a tag starts the video capture and the second trigger stops the capture. Not all phones allow simultaneous camera usage, so you may get a "Camera busy" or some other message on the screen when you try this.
More Complex Commands
If you want to pass an app some data when the app is started, the command creation process is much more complex. So complex it probably requires a developer's point of view to be able to create such commands.
FlickStart allows you to create such complex commands, but assumes you have the necessary knowledge of the target app to choose the correct mechanisms provided while building the command.
For details about building commands which pass data to apps see the command creation section in the FlickStart manual.
