 available on
  also available on


 FlickNet
Introduction
FlickNet comes in two parts, an Android app which sits on your phone(s) and a Windows app which sits on your PC(s).
When the two parts are in place and communicating you can drive PC apps by:
With FlickStart, the trigger to send a key sequence to the PC(s) might be a "right" move with your phone to make a PowerPoint presentation on your PC move to the next slide. A "left" move of the phone would go back one slide.
You can also trigger commands by doing a long press on commands when viewing them in the 'TAGS' tab of FlickStart.
On this page we go through the steps required to get FlickNet controlling a PC app.
Further pages provide information on
Take a look at the video that shows FlickStart driving some PC apps via FlickNet.
Because the communication path between the phone and the PC uses WiFi you can control the PC from a much greater distance than you might with a Bluetooth keyboard.
Getting the components you need
If you plan to send commands from FlickStart you will need to have FlickStart from the Google Play Store installed and functioning on your phone.
You will also need to have FlickNet from the Google Play Store installed and functioning on your phone.
Finally, you will need to get the installer for WinFlickNet from our website onto your PC, run the installer and then start the WinFlickNet app on the PC. WinFlickNet uses the Microsoft .Net library version 4.5.2 (or higher), so that library will end up installed on the PC if it's not already there.
Setting up on the Phone and PC
We assume you have all the components from the section above installed and running.
The most important element of the setup is that the phone and the PC be on the same WiFi network. FlickNet expects to find WinFlickNet (on your PC) using the WiFi connectivity on your phone.
The process of finding each other is automatic but you can confirm the connection by looking in the 'CONNECTIONS' tab of your phone where a list of discovered PCs will be shown (only PCs running WinFlickNet will be discovered):
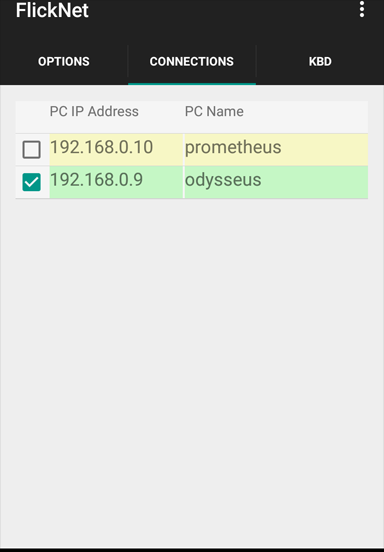
A line with a green or yellow background indicates FlickNet is currently connected to the copy of WinFlickNet running on that PC. If you have a green line showing to the PC you want to control then both the phone and PC end are ready for a command (and you can go on to the next section).
A white background indicates that FlickNet has seen the PC in question before, but currently can't connect to it (probably because WinFlickNet is not running on that PC or your phone is no longer on the same network).
The checkbox on the left of each line allows you to control which PCs will receive commands when you trigger them from FlickStart. If you set the check mark FlickNet will forward any commands to that PC. If you uncheck the box, FlickNet won't forward commands to that PC (even if there is a connection). When the checkbox is unticked and the phone and PC are connected, the background colour for that line is yellow rather than green.
A very similar interface appears on WinFlickNet on the PC. However, the list on the PC is all about phones that the PC has seen:
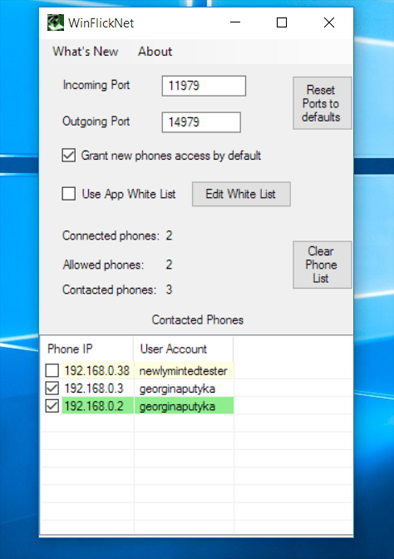
A line with a greenish background indicates the PC is connected to that phone and will accept commands from that phone. A white background indicates the PC has seen the phone before but is currently not connected to it (the phone in question might not be on the PC's network, or FlickNet might not be running on the phone).
Each line has a checkbox. If the box is checked, the PC will act on commands sent by that phone. If the box is unchecked, commands from the phone are ignored.
Getting and Using Tags
This section and the next one apply when you are using FlickStart to control PC apps via FlickNet rather than typing keys directly into the 'KBD' tab of FlickNet.
The last setup step is to import tags into FlickStart that can drive your PC apps.
Tags in FlickStart are commands grouped together because of some relationship. For instance you can download a tag from our website called 'PowerPoint on Windows' which allows the phone to control some functions in PowerPoint. This tag has four commands each one doing a different operation on PowerPoint.
We have created a number of tags, each driving a different PC app. You can download any of the tags and use the 'Import a file' entry in the menu of FlickStart. Check out the list and download the tags which correspond to apps you have on your PC already.
You can trigger a command by doing a long press on it when looking at the list commands in a tag.
To drive an app from FlickStart using movements you need to have the tag for the app active (use the 'Flip Active State' button in the FlickStart 'TAGS' tab after selecting the tag), and a sensor active (tap on the 'HANDHELD' button on the 'MOVEMENTS' tab in FlickStart). Also, make sure the app you want to drive is running on the PC and has some data to play with (a book if it's a reader, a playlist if it's a music player, etc.).
Building and Editing Tags
If you want go beyond the functions supplied on the downloads page then you will need to get into the details of how commands for PC apps are set up.
Start with the FlickStart Commands for FlickNet page.
